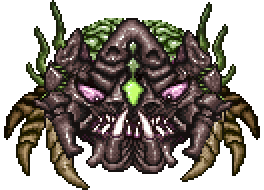
Ocram (Consolaria)
| Type | |
|---|---|
| AI Type | Ocram AI |
| Damage | 216 / 300 / 450 |
| Max Life | 27,000/54,000 / 35,100/70,200 / 52,650/105,300 |
| Defense | 36 |
| KB Resist | 100% |
| Immune to |
| Coins | 10 |
|---|
- Item (Quantity)Rate
 Soul of Blight(Consolaria) (15-40)100%
 Greater Healing Potion (5-15)100%
- One of the following four items will be dropped
 Eternity Staff(Consolaria)25%
 Dragon's Breath(Consolaria)25%
 Ocram's Eye(Consolaria)25%
 Tizona(Consolaria)25%
 Ocram Mask(Consolaria)12.5%
 Ocram Trophy(Consolaria)10%
 Treasure Bag(Ocram)
- •
 Shadowbound Exoskeleton
- •
 Ocram Relic(Consolaria)
 Cursed Fang(Consolaria)
| Hurt | |
|---|---|
| Killed | |
| Spawn | |
| Eye Laser | |
| Scythe | |
| Summoning Servants of Ocram | |
| Charge |
Ocram is a Hardmode boss that is meant to be fought between the 3 Mechanical Bosses and Plantera. In Consolaria, it can only be summoned after Plantera has been defeated. This is because the item required to summon Ocram can only be crafted using ectoplasm, an item only obtainable in the dungeon after Plantera has been defeated. It is summoned with the ![]() Suspicious Looking Skull at night in a Hardmode world and is the only way of obtaining
Suspicious Looking Skull at night in a Hardmode world and is the only way of obtaining ![]() Souls of Blight.
Souls of Blight.
When Ocram is alive, its exclusive Ocram theme will play if a Blood Moon is not active, otherwise Eerie Ocram will play.
Behavior
First phase
Ocram hovers above the player while firing red lasers five times in a row before firing a barrage of red lasers. It summons Servants of Ocram while quickly flying in a circular motion, similar to Duke Fishron's second form. This attack is then followed by four consecutive charges at the player.
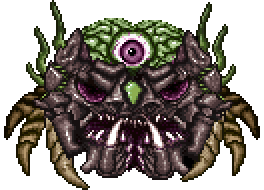
Second phase
After Ocram's health is reduced to around half, it switches to its second form, during which its damage doubles and Servants of Ocram stop spawning. Additionally:
- Charging at the player becomes almost constant.
- Its laser changes to a much more damaging blue version.
- Demon Scythe projectiles accompany its charges.
It also gains a new attack pattern:
- Fires a barrage of blue lasers whilst sitting still, now with an increased duration and firing rate.
- Dashes several times at the player while firing Demon Scythes.
- Hovering above the player while continuously firing Demon Scythes.
- Ocram's attacks become faster as the battle goes on.
Blood moon
Ocram becomes even more difficult if fought during a Blood Moon.
It also adds new patterns to existing attacks:
- Ocram now fires red lasers while summoning Servants of Ocram in its first form.
- Skulls will periodically fall from the sky during Ocram's second form.
- Ocram now charges more rapidly at the player in its second form.
Notes
- Attempting to use the Suspicious Looking Skull during the day will do nothing, and the item will not be consumed from the player's Inventory.
- Ocram tends to get closer to the player than most bosses. This can sometimes prove helpful to players using melee or short ranged weapons.
- All of Ocram's attacks will phase through blocks.
- Ocram will change into its second form relatively early compared to other bosses. Transforming when around 64% of its health is remaining.
Tips
- Using the Paladin's Hammer is a very good choice as it does high damage to the Servants of Ocram and Ocram itself.
- Crystal Bullets or Chlorophyte Bullets with a strong gun such as the Megashark or Clockwork Assault Rifle can do high damage against Ocram.
- The Flairon is very effective as the homing bubbles group together and home in towards Ocram and its Servants, dealing high damage.
- Placing clouds from the Nimbus Rod helps to do damage while the player is busy avoiding attacks.
- If you can get a Piranha Gun, you can simply evade Ocram, only requiring you keep the mechanical piranha latched onto Ocram.
- The Nettle Burst can be useful as Ocram tends to float in one area.
- The Bubble Gun is very effective for its rapid damage.
- Minions such as the Optic Staff or Raven Staff are effective against Ocram. Sentries such as the Queen Spider Staff or Staff of the Frost Hydra are good additional minions.
- Spectre Armor (with the Hood) with Razorpine combined with the effects of the Mana Flower (as long as you have enough Mana potions) can make the fight with Ocram ridiculously easy.
- Firing up with the North Pole is very useful against Ocram for he stays in the same area for most of the battle.
- The Daedalus Stormbow with Holy Arrows will decimate Ocram.
Trivia
- In the original game, the music Boss 5 would play when fighting Ocram. In Consolaria, Ocram has its own tracks.
- The Ancient Warlock armor in Consolaria was taken from an old Spectral Armor sprite prior to 1.2 update.
- "Ocram" spelled backwards is "Marco", the name of Ocram's original programmer.
- The name of Ocram's master mode light pet, Lil' Marco, is a reference to "Marco", Ocram's original programmer.
- Due to the bosses in Consolaria all having a different type of master mode drop, Lepus having a pet, Turkor the Ungrateful having a mount, and Ocram having a light pet, it is possible to equip every one of Consolaria's master mode items at once.
- The Bestiary entry for Ocram: "This forgotten blighted demon, once the powerful Emperor of Darkness, now seeks revenge against all surface dwellers."
- Consolaria
- Consolaria/Boss NPCs
- Consolaria/Surface NPCs
- Consolaria/Ocram AI NPCs